Cross-Curricular Connections: Exploring Our "Autumn Leaves" Unit
Sep 11, 2024
Fall is here, and one way to celebrate its arrival is by completing our Content Library Junior subunit, Autumn Leaves, part of our larger Seasonal Creations module! This activity teaches students how to write a program that animates a scene where leaves fall to the ground.

Using the Scratch editor in Autumn Leaves
Before we begin writing code for this program, we start by setting the scene. This involves learning to use the Scratch editor to draw a leaf sprite, and to create the background.
In most Content Library Junior activities, we either use sprites that are already available in Scratch, or we upload pictures that can be used as sprites. Sprites are the characters and other objects that can be placed on the stage and programmed in Scratch. Autumn Leaves is one of the more unique programs we have because students also learn to create their own sprite from scratch.
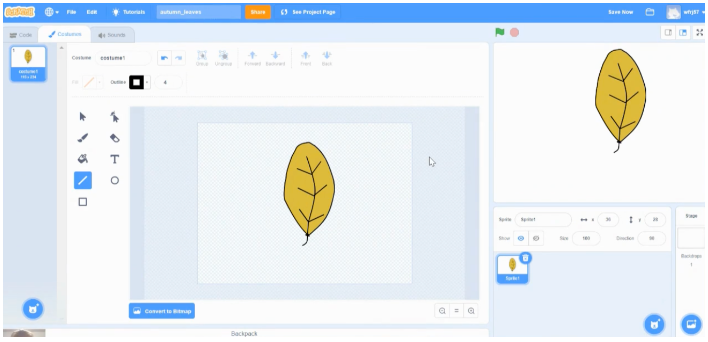
To create a sprite, the programmer needs to hover on the Cat Head icon in the lower right hand corner of the Scratch screen and select the Paint Brush option. This opens up the graphics editor, which provides different options on the left side that can be used for different purposes, like drawing lines, drawing shapes, and writing text.

To create a leaf, we teach students not only to use different shapes - leveraging their geometric skills - but to modify and reshape them to create the exact look of the leaf that they want. We start by first clicking the Circle tool and drawing a circle on the screen. From here, the programmer needs to select the Arrow and Dot icon, which is the Reshape tool. Once selected, clicking on different parts of the circle causes little blue circles to appear that indicate where the programmer can click to move individual nodes of the shape. As a node is moved, the segments attached to it move, too. The effect is similar to using rubber bands and nails on a wooden board. Adjusting the shape to be exactly as you want it to be can be tricky, but through this unit and continued practice, students learn how to elongate the circle and make it look more like a leaf.

From here, we use the Line tool to make the individual lines in the leaf and to create its stem. Because a leaf’s stem can bend, and the Line tool draws straight lines, students have another opportunity to practice using the Reshape tool.
Why This Matters
If students are not yet coding, why is this section of the unit so important, and how does this contribute to their technical skills?
To start, any program that requires students to navigate the computer to accurately and effectively complete a given task, including using keyboard controls and a touchpad or mouse, helps build technology literacy. In our world today, technology is ever-changing and the ability to use digital tools is required in various careers. In fact, a study recently completed in 2023 by the National Skills Coalition and the Federal Reserve Bank of Atlanta found that 92% of jobs require some sort of digital skills. It is important for our children to have the foundational skills necessary to set them up for success.

In addition to this, many of the skills students learn when working in the graphics editor can be applied to other computer programs as well. There are options at the top of the editor to Copy and Paste, which may be needed to duplicate parts of a sprite or parts of a backdrop. We teach students that they can also use the keyboard to copy and paste. This can be done by highlighting the part(s) of the image to be copied and pressing first Control C and then Control V on the keyboard. (We also always point out that this is Command C and Command V on a Mac!) Copying and pasting can be done in loads of computer programs, like Microsoft Word or Google Docs, and it can save a significant amount of time depending on the task at hand. This is one of the simpler computer skills to learn, but without ever learning how to do it, without practice using the keyboard, and without exposure to even the most basic of skills, students will not have the foundation they need to thrive in the working world.
Further, there are also tools in the graphics editor students learn to use that can apply to editing images or objects in other programs like Tinkercad or Canva. For instance, you may want to create a sprite that has multiple parts to it. Imagine you’re creating a model of a Ferris wheel. When you go to make adjustments to your model, each seat is its own entity, and you may find your cursor moving just a piece of the Ferris wheel rather than the ride as a whole. In many programs, you can hold down the Shift key on the keyboard, select all of the seats and the Ferris wheel base itself, and click Group. For those interested in design-related fields, this is a key transferable skill that will likely often be applied to their work. This is just one of many examples in which the skills learned by navigating the Scratch editor can benefit your students. Be sure to allow your students adequate time to explore and create with the editor to practice and enhance these skills!
The Coordinate Plane in Autumn Leaves
So now let’s explore the coding piece of this unit. As with all of our units, there is more than one academic skill at play, in addition, of course, to the computer science skills being exercised. One of these is a recurring skill that pops up in many of our Content Library Junior units - understanding the coordinate plane. If you’ve read other Cross-Curricular Connections posts before or have worked through one of these units with your students, you already know that the Scratch stage is a coordinate plane, spanning from -240 to 240 horizontally, or on the X-axis, and from -180 to 180 vertically, or on the Y-axis.
This is important for programs like Autumn Leaves, where you want to program leaves to fall throughout the scene and to the ground. Leaves do not fall straight down, but float through the air on a nonlinear path. So, if we want the leaves in the program to appear as if they are floating through the air on their path to the ground, we have to program them to pass through different points on the coordinate plane as they fall. 
Similarly, our Winter Scene unit teaches students to program snow falling to the ground. Snow falls throughout the sky during a snowstorm. In this program, snowflakes should appear across the entirety of the Scratch stage. To make this happen, the snowflakes have to be programmed so that they can float randomly throughout the coordinate plane.

Returning to our Autumn Leaves scene, there are multiple instances in which an understanding of the coordinate plane is key. If the programmer wants the leaf sprite to start in a certain place on the Stage, a go to x: y: instruction should be used to place the leaf in its intended starting position. In the Winter Scene unit, we teach students how to write a program so that snowflakes randomly fall to the ground. In this unit, we teach students to position the leaf at different points in its path to the ground, and they use glide instructions to program the leaf to fall through those points on the screen. These two projects use the coordinate plane in different ways, but both require an understanding of coordinates and how to use them to position sprites in order to create a successful program. To ensure the leaf falls to the ground, the programmer must include the correct x and y coordinates in each glide instruction.
Supplemental Activities and Materials
These concepts can get tricky, especially at the elementary level. Therefore it can be helpful to incorporate supplemental activities to help students understand ideas that can then be applied to programming.
On graph paper, a sample coordinate plane can be created for students to learn how to plot points, create shapes and lines, and get used to navigating the different quadrants of the plane.
The Scratch backdrop library includes a background called Xy-grid, which depicts the Scratch coordinate plane. However, unlike traditional graph paper that allows you to highlight every point on the plane using a scale of 1, the Xy-grid uses a scale of 100. Starting with graph paper and teaching students first how to plot points is a stepping stone to then understanding how to navigate a plane where each box is separated by 100.
 This image shows the Xy-grid backdrop in Scratch.
Once students can comfortably plot points, the Xy-grid backdrop can be printed out and students can continue to practice plotting points on this particular coordinate plane. Why use paper? Students can trace the pathway of a falling leaf, plotting points along the way, to better determine the x- and y-coordinates needed for their glide instructions once they begin programming.
For students who are not yet able to grasp these concepts and create the pathway of their leaves using the Xy-grid backdrop, Scratch automatically changes the x- and y-coordinates of a sprite as it is moved around the Stage. Students can drag their leaf sprite to the different points it will pass through as it moves to the ground. At each point, students can record the x- and y-coordinates or simply select a new glide instruction, as the coordinates with the instruction will automatically change when the leaf is moved. Once students are ready for an additional challenge, they can trace an alternate leaf pathway on the printed coordinate plane and identify the x- and y-coordinates they will need to use in the program, without relying on Scratch to automatically update these values. These supplemental activities provide students with scaffolding, and they can be used to present extra challenges, depending on the student’s skill set.
The Importance of Incorporating Coding
Whether you’re a teacher in a classroom or a parent homeschooling your children, exposing your students to these types of activities is so important to build a foundation for their future success.

Content Library Junior activities can be easily incorporated into your curriculum, as we cover a variety of academic skills in each unit. Often, we repeat exposure to certain skills, providing students with additional practice in these areas.
But perhaps more important than the repeated exposure to academic skills is the repeated exposure to problem solving. Not every child will work in IT or become a programmer, but all children, no matter the pathway they choose, will inevitably face challenges in their lives. The more children learn they can use various skill sets and knowledge to a situation to determine the answer, the better problem solvers they will be and the easier they will be able to navigate in their careers.
Stay connected with news and updates!
Join our mailing list to receive the latest news and updates from our team.
Don't worry, your information will not be shared.
We hate SPAM. We will never sell your information, for any reason.
